What are crop marks?
Crop marks, also known as trim marks, are lines printed in the corners of your publication’s sheet or sheets of paper to show the printer where to trim the paper, by adding a fine (hairline) horizontal and vertical rules that define where the page should be trimmed. Crop marks can also help register (align) one color separation to another. By using together with bleed marks, you can select overlapped marks.
What is the difference between crop marks and trim marks?
In general, there is no real difference, as they do the same thing, it just depends on who is talking about them.
How do I add Crop Marks from an object?
Supposing that you have a proof approval form (or similar) and you want to show the artwork together with crop marks, bleed marks and all the relevant specification for the project. Being able to set crop marks from an object is handy as you are preparing your artwork on a drafting sheet so to speak. I like to use this tool when preparing artwork for clients that require version control on the actual artwork file for reference to be transferred to a PDF, etc.
It’s pretty simple really, although easy to forget if you don’t use it often.
Locate the Script
- Open InDesign and check to see if the script you need is already installed.
- With the program open, go to Window > Utilities > Scripts.
- This opens the Scripts palette.
- Open the Samples folder by double-clicking on it
- Next open the JavaScript folder and look for the CropMarks.jsx script file
- These are often already installed.
- If it is not already installed, install via your InDesign or Creative Suite download by dragging the script into your script folder.
- Once you have done this in InDesign, the CropMarks.jsx script file will always be ready for you to run and you won’t need to reinstall the script.
Select the object and make the crop marks
- Add an object that to your artwork that you want to draw crop marks around
- From the Scripts palette, double-click on the CropMarks.jsx file to run the script.
- Enter your requirements in the dialog box and hit OK.
- Your marks will be matched to your specifications.
How do I add Marks and Bleeds via Document Setup
When you prepare a document for printing, a number of marks are needed to help the printer determine where to trim the paper, align separation films when producing proofs, measure film for correct calibration and dot density, and so on. Selecting any page-mark option expands the page boundaries to accommodate printer’s marks, bleed (the parts of text or objects that extend past the page boundary to account for slight inaccuracy when trimming), or slug area (an area outside the page and bleed that contains printer instructions or job sign-off information).
If you are setting crop marks and want the artwork to contain a bleed or slug area, make sure that you extend the artwork past the crop marks to accommodate the bleed or slug. Also make sure that your media size is large enough to contain the page and any printer’s marks, bleeds, or the slug area. If a document doesn’t fit the media, you can control where items are clipped by using the Page Position option in the Setup area of the Print dialog box.
If you select the Crop Marks option, fold marks are printed as solid lines when spreads are printed.
- Choose File > Document Setup from the Menu Bar
- From here you get to choose a number of components for your artwork file. For instance:
- Number of Pages
- Facing Pages
- Page Size
- Orientation
- Margins
- Bleed and Slug
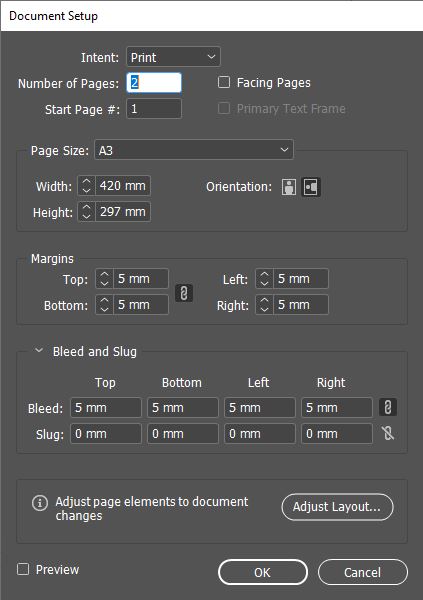
- Once completed, click OK to finish.
How do I print with Crop Marks via Print?
File Preparation for Printing
- Choose File > Print.
- Click Advanced on the left side of the Print dialog box.
- Transparency Flattener > Preset > [High Resolution]
- Color Management – default, no change
- Graphics – default, no change
- Output – depends, if you are printing CMYK you will need to select Ink Manager > click on the check-box for All Spots to Process > OK.
- Marks and Bleed > select either All Printer’s Marks, or check individual selections.
- Offset – default
- Bleed and Slug > check Use Document Bleed Settings, or override by entering custom bleeds
- Setup – Paper Size: select Custom or appropriate size
- Orientation
- Scale
- Page Position
Printing Only Marks and Bleed
- Choose File > Print.
- Click Marks and Bleed on the left side of the Print dialog box.
- Select either All Printer’s Marks or the individual marks checkboxes.
Print the bleed or slug areas
Specify the bleed and slug areas in the Document Setup dialog box. The bleed and slug areas are discarded when the document is trimmed to its final page size. Objects outside the bleed or slug area (whichever extends farthest) are not printed.
When printing, you can override the default location for bleed marks in the Bleed And Slug area of the Marks And Bleed area.
Files saved in PostScript file format allow capable post-processing programs to implement their own variable bleed.
- Choose File > Print.
- Click Marks And Bleed on the left side of the Print dialog box.
- Select either All Printer’s Marks or individual marks.
To override bleed settings in the Document Setup dialog box, uncheck Use Document Bleed Settings and enter values for Top, Bottom, Left, and Right (for single-sided documents), or Top, Bottom, Inside, and Outside (for double‑sided documents with facing pages). To extend the offset evenly on all sides of the page, click the Make All Settings The Same icon.
- Click Include Slug Area to print objects using the slug area defined in the Document Setup dialog box.
Note: You can preview the bleed and slug areas before printing by clicking the Bleed Preview Mode or the Slug Preview Mode icon at the bottom of the Toolbox. (These may be hidden by the Preview Mode icon)
Marks and Bleed Options
All Printer’s Marks: Selects all printer’s marks including crop marks, bleed marks, registration marks, color bars, and page information.
Crop Marks: Adds fine (hairline) horizontal and vertical rules that define where the page should be trimmed. Crop marks can also help register (align) one color separation to another. By using together with bleed marks, you can select overlapped marks.
Bleed Marks: Adds fine (hairline) rules that define the amount of extra area to image outside the defined page size.
Registration Marks: Adds small “targets” outside the page area for aligning the different separations in a color document.
Color Bars: Adds small squares of color representing the CMYK inks and tints of gray (in 10% increments). Your service provider uses these marks to adjust ink density on the printing press.
Page Information: Prints the filename, page number, current date and time, and color separation name in 6-point Helvetica in the lower-left corner of each sheet of paper or film. The Page Information option requires 0.5 inches (13mm) along the horizontal edge. Please note that page information is printed in GothicBBB-Medium-83pv-RKSJ-H (Medium Gothic) font.
Type: Lets you choose default printer’s marks or custom marks (for Japanese pages, for example). You can create custom printer’s marks or use custom marks created by another company.
Weight: Displays possible weights for crop and bleed mark lines.
Offset: Specifies how far from the edge of the page (not the bleed) InDesign will draw printer’s marks. By default, InDesign draws printer’s marks 6 points from the edge of the page. To avoid drawing printer’s marks on a bleed, be sure to enter an Offset value greater than the Bleed value.
Change the page position on the media: When you print a document to a cut-sheet media size that is larger than the document size, you can control where the slug and bleed areas, printer’s marks, and page fall on the media by using the Page Position options in the Setup area of the Print dialog box. If a document doesn’t fit the media and needs to be clipped, you can specify which part of the document is clipped. The preview image in the Print dialog box shows the results.
Note: To see the bleed and slug areas and printer’s marks, use the Scale To Fit option instead of Page Position; scaled pages are always centered. The Page Position options are unavailable when Scale To Fit, Thumbnails, or Tile is selected. In the Setup area of the Print dialog box, choose a position in the Page Position menu.
Original Source & Reference Acknowledgement
https://www.techwalla.com/articles/how-to-make-crop-marks-on-a-shape-in-indesign